

To support our research and detailed appliance reviews, we may earn a small commission from qualifying purchases made through our links, at no extra cost to you. As an Amazon Associate, I earn from qualifying purchases.
To support our research and detailed appliance reviews, we may earn a small commission from qualifying purchases made through our links, at no extra cost to you. As an Amazon Associate, I earn from qualifying purchases.
If you are searching for How to repair LED Bulb, you probably feel a mix of concern and curiosity. ⚡
Maybe a favorite lamp stopped working. Maybe you want to save money and avoid unnecessary waste.
You may also feel a bit nervous about safety, and that feeling is completely valid.
This guide walks you through clear, safe steps.
You will learn what you can realistically fix at home and when to stop.
We will also protect your health and your home by focusing on low‑risk checks and repairs.
You will find:
- Simple explanations with minimal technical jargon.
- Clear safety advice before every practical step.
- Realistic examples of what people actually fix at home.
- A gentle reminder that your safety comes first. 🛡️
Before You Start: Safety, Health, and Realistic Expectations
Working with anything related to electricity requires respect.
Your goal is not only to fix a bulb.
Your goal is to stay safe, protect your eyes and hands, and avoid stress.
Key safety rules
- Always unplug the lamp or turn off the circuit.
- Never work on a live socket or fitting.
- Let a recently used bulb cool completely before touching it.
- Wear safety glasses if you will open a bulb.
- Wear thin gloves to protect your hands from glass or sharp edges.
If you feel anxious or unsure, pause.
A new bulb costs much less than a medical emergency or a fire.
When you should not try to repair
Avoid home repair if:
- The bulb is part of a sealed fixture that you cannot open safely.
- You see burn marks, melted plastic, or a strong burning smell.
- The bulb is still under warranty.
- You do not feel comfortable around electrical parts at all.
In these cases, recycle the bulb and replace it.
Your peace of mind is more valuable than one repair.
A quick real‑life example
Maria noticed a flickering LED in her reading lamp.
She unplugged the lamp, tried another bulb, and saw the lamp was fine.
The problem was inside the bulb.
She felt nervous about opening it, so she chose recycling instead.
That choice was safe, responsible, and completely valid. ✅
Understanding How LED Bulbs Work (Without Overwhelming Detail)
Knowing the basics helps you decide how to repair led bulb problems calmly.
You do not need to become an engineer.
You only need a simple picture in your mind.
Most LED bulbs contain four main parts:
- The plastic or glass diffuser on the front.
- The small LED chips that create light.
- A driver board that manages voltage and current.
- The metal base that screws into the socket.
Common issues often come from:
- A loose connection inside the bulb.
- A failed component on the driver board.
- Overheating due to poor ventilation.
- Damage from sudden power surges.
Some of these are repairable at home.
Others require tools and skills that most people do not have.
The next sections help you separate the two.
Step‑by‑Step Guide: How to repair LED Bulb at Home
This section is the practical core of How to repair LED Bulb problems safely.
Follow each step slowly.
Stop anytime something feels unsafe or confusing.
Step 1: Inspect the Bulb and Your Environment 🧐
Before touching the bulb, focus on safety and context.
This is your health and your home.
- Turn off the switch.
- Unplug the lamp or turn off the breaker.
- Let the bulb cool fully.
- Make sure the area is dry and well lit.
Now remove the bulb gently.
Hold it by the base, not the glass or plastic dome.
Examine it under good light.
Check for:
- Cracks in the plastic or glass.
- Burn marks near the base.
- A wobbly or loose metal base.
- A strange smell, like burnt electronics.
If you see heavy damage or melted areas, do not open the bulb.
This suggests serious internal failure.
In that case, discard it safely and choose a new one.
Also test the socket with a working bulb.
If the new bulb also fails, the issue is not with the bulb.
Stop and have the fixture or wiring checked by a qualified electrician.
Real example:
A parent notices their child’s desk lamp flickers.
They try another LED bulb, and it works perfectly.
The issue is inside the old bulb, not the lamp.
The parent now knows where to focus.
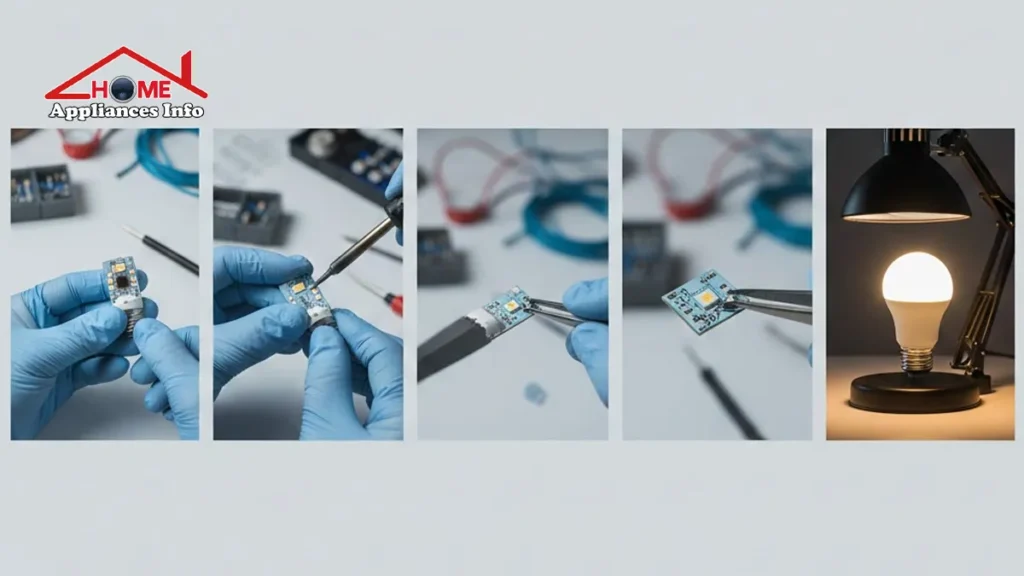
Step 2: Open the Bulb Housing Carefully 🔧
If the bulb looks intact and you feel comfortable, you can open it.
This is optional, but often needed for further checks.
Many common LED bulbs have:
- A plastic diffuser on the front, often clipped or lightly glued.
- An internal plate holding the LED chips.
- A driver board near the base.
How to open safely
- Work on a clean, flat, stable surface.
- Use a small flat screwdriver or a thin plastic pry tool.
- Gently insert the tool between the diffuser and the body.
- Twist slowly to ease the diffuser off.
Keep your face away from the bulb while prying.
Use safety glasses if possible.
Plastic can crack unexpectedly.
Once the diffuser is off, you may see:
- A ring of small LED chips on a circular board.
- Wires running to a driver circuit near the base.
If everything looks heavily burned or broken, stop.
At that point, replacement is safer than repair.
Step 3: Check and Address Common Faults 🧰
This step is where you do the most practical work.
It is also where you must stay very aware of limits.
You are not trying to rebuild the entire driver board.
You are looking for simple, low‑risk problems.
Common safe checks include:
- Loose wires or connections.
- Cracked solder joints at obvious points.
- Dust or debris on accessible surfaces.
Typical LED bulb symptoms and what they may mean
| Symptom | Likely Issue | Safe Home Check | When to Stop and Replace |
|---|---|---|---|
| Does not light at all | Broken internal connection | Look for loose wires or wobbling LED board | If base or board is burnt or heavily cracked |
| Flickers, then turns off | Overheating or driver stress | Check for dust, blocked vents, hot enclosed fixtures | If casing is warped or brown from heat |
| Very dim compared to before | Failing LED chips or driver aging | Check for a few dark LED chips among bright ones | If many chips are dark or burned |
| Works only when tapped | Loose connection or cracked solder | Gently press parts and see if anything moves | If movement is near mains wiring or base |
| Smell of burning plastic | Serious internal failure | Do not open further | Replace and recycle, avoid using that fixture |
Simple, lower‑risk fixes
- Tightening screws or clips
Some LED boards use small screws to hold parts in place.
Gently tighten loose screws with a matching screwdriver.
Do not over‑tighten and crack the board. - Reseating loose connectors
Some bulbs use plug‑in connectors.
If a small connector looks loose, unplug and replug it carefully.
Make sure power is completely off while doing this. - Cleaning mild dust
If you see light dust on the diffuser or housing, wipe it gently.
Use a dry, clean cloth.
Do not use liquids inside the bulb. - Supporting a slightly loose base
Sometimes, the metal base twists slightly from the plastic body.
If the connection is not cracked or burnt, you may gently realign it.
Hold both parts and twist very slightly until stable.
Stop at the first sign of resistance.
If you have electronic repair experience, you may consider basic solder touch‑ups.
However, many people do not have the right iron or skills.
Poor soldering increases fire risk and exposure to fumes.
If you are not confident, avoid soldering steps at home.
For broader background on safe LED use, see the U.S. Department of Energy’s
official LED safety guidelines.
Step 4: Test the Bulb Safely 🔌
Once you have checked and adjusted what you can, it is time to test.
This must be done carefully to protect both you and your home.
- Reassemble the bulb if you removed the diffuser.
- Make sure all parts sit properly and nothing is loose.
- Screw the bulb back into a known good socket.
- Stand a short distance away from the fixture.
- Turn on the power.
Watch and listen:
- Does the bulb light immediately and stay stable?
- Does it flicker, buzz, or change color?
- Does any smell appear within the first minute?
If the bulb now works consistently for several minutes, you likely fixed a minor issue. 🎉
If the bulb still fails, remove it and unplug the lamp again.
Do not keep testing a malfunctioning bulb for long periods.
Real example:
Alex had a bulb that worked only when tapped.
He opened it, found a loose internal connector, and reseated it.
After reassembly, the bulb worked normally with no more tapping.
He tested it for several evenings before trusting it fully.
Step 5: Decide to Reuse, Recycle, or Replace 🌱
Not every bulb can or should be repaired.
Knowing when to stop is part of learning How to repair LED Bulb responsibly.
When to reuse
Reuse the bulb if:
- It now lights reliably without flicker.
- There are no strange noises or smells.
- The housing remains cool or slightly warm only.
Continue to watch it for the first week.
If any new symptoms appear, retire it carefully.
When to recycle
Recycle the bulb if:
- It stays dead after simple checks.
- You see burnt components or melted parts.
- You are unsure about its safety after reassembly.
LED bulbs do not contain mercury like many older lamps.
However, they still include electronic components.
These should not go into regular household trash.
Many communities accept LEDs at electronic or household waste centers.
For more on recycling LED bulbs, see guidance from the
U.S. Environmental Protection Agency’s page on
recycling LED bulbs.
When to replace instead of repair
Choose replacement if:
- You feel anxious about safety every time you use the bulb.
- You lack the tools or vision to see tiny components clearly.
- The bulb is very old and has lost brightness over time.
Sometimes the healthiest choice is to let the bulb go.
Your stress level is an important signal.
Listen to it.
Emotional Side of DIY Repairs: Your Comfort Matters 💖
Many people feel nervous the first time they open an electrical device.
That reaction is normal and protective.
You are allowed to stop at any step.
Think of this guide as support, not pressure.
If you complete only Step 1 and Step 5, that is still success.
You have learned more about your home and your limits.
Small, safe projects can build confidence over time.
But your mental comfort is just as important as the repair itself.
Frequently Asked Questions
1. Is it safe to learn How to repair LED Bulb problems by myself?
It can be safe if you respect clear limits.
Always disconnect power before touching anything.
Avoid deep work on the driver board or mains wiring.
If something looks burnt or smells wrong, stop and recycle.
When in doubt, replacement is the safer choice.
2. What tools do I need for how to repair led bulb at home?
Basic tools are usually enough:
- A small flat screwdriver or pry tool.
- A matching small Phillips screwdriver.
- Safety glasses and light gloves.
- A clean, stable work surface.
More advanced tools, like soldering irons or multimeters, are optional.
Use them only if you already know how to use them safely.
3. Why did my LED bulb start flickering after a few months?
Common reasons include:
- Poor ventilation causing overheating.
- A loose connection inside the bulb.
- A low‑quality driver component aging quickly.
- Voltage fluctuations in your home wiring.
You can test with another bulb in the same fixture.
If both flicker, have the fixture or wiring checked professionally.
4. Can I repair every type of LED bulb?
No.
Some LED bulbs are sealed with strong adhesive or complex housings.
Smart bulbs with Wi‑Fi or Bluetooth features are often complex inside.
These designs are not ideal for casual home repair.
Trying to open them can cause damage or safety risks.
In these cases, recycling and replacement are better.
5. How long should a repaired bulb last?
If the issue was minor, like a loose connector, it may last quite long.
However, a repaired bulb can be less reliable than a new one.
Use it in lower‑risk locations, like table lamps, not critical areas.
If it fails again soon, do not keep repairing it repeatedly.
6. Is it worth learning how to repair led bulb for just a few bulbs?
Understanding how to repair led bulb issues has wider value.
You learn how your lighting affects comfort, eyes, and safety.
You reduce waste and gain practical confidence.
Even if you only rescue one or two bulbs, the knowledge can help later.
Conclusion: Using What You Learned About How to repair LED Bulb 🏠
You have now walked through five clear steps on How to repair LED Bulb issues.
You learned how to inspect a bulb, open it carefully, and spot common faults.
You also learned to respect your limits and protect your health.
The key points to remember:
- Safety and peace of mind come first, always.
- Simple checks at home can solve some problems.
- Burnt, melted, or heavily damaged bulbs belong in recycling, not in repairs.
- Your comfort level is a valid reason to stop at any time.
Use this guide as a calm reference when a bulb fails.
Choose the steps that feel safe and manageable today.
Each small repair attempt builds knowledge, even if the bulb ends up recycled.
Now that you understand How to repair LED Bulb safely and effectively,
you can care for your home lighting with more confidence and less stress. 💡✨
2 Comments
Pingback: LED Light Flicker: 5 Proven Tips to Solve the Problem
Pingback: Sump Pump: 7 Ultimate Reasons Why a Sump Pump Is Essential for Home Safety