


To support our research and detailed appliance reviews, we may earn a small commission from qualifying purchases made through our links, at no extra cost to you. As an Amazon Associate, I earn from qualifying purchases.
To support our research and detailed appliance reviews, we may earn a small commission from qualifying purchases made through our links, at no extra cost to you. As an Amazon Associate, I earn from qualifying purchases.
If you’ve been wondering how to clean refrigerator coils, you’re not alone. In my experience, this is one of the most overlooked parts of basic home appliance maintenance. Most people wipe shelves, toss expired leftovers, and scrub drawers. But the hidden condenser coils? They often go untouched for years.
That matters more than many homeowners realize.
Your refrigerator depends on those coils to release heat. When dust and lint buildup coats them, the system can’t breathe properly. The fridge compressor has to work harder. Noise increases. Power use rises. Cooling can become uneven. I’ve seen fridges run almost nonstop simply because the coils were buried in pet hair and kitchen dust.
The upside is simple: coil cleaning is fast, inexpensive, and very doable for most people. You do not need advanced tools. You do not need a service call in many cases. You just need the right method, a little care, and about 20 to 40 minutes.
In this guide, I’ll walk you through exactly what I’d do at home, including how to clean refrigerator coils underneath, what tools actually help, the most common symptoms of dirty refrigerator coils, and how often to clean refrigerator coils so you avoid bigger problems later.
If you like practical home fixes, this same preventive mindset also helps with issues like How to Clean Washing Machine with Vinegar and Baking Soda or How to Repair Electric Pressure Cooker Problems. Small maintenance habits really do prevent expensive breakdowns.
1. Why refrigerator coils matter more than most people think
Refrigerator coils are part of the heat-release system. Their job is to move heat from inside the fridge out into your kitchen air. When they’re clean, airflow stays open and the refrigerator maintains steady cooling efficiency.
When they’re dirty, the opposite happens.
The layer of dust acts like insulation. Heat gets trapped. The compressor runs longer. Energy use increases. Over time, that extra strain can shorten component life.
Most appliance experts agree that keeping condenser coils clean helps support:
- Better energy efficiency
- More stable food temperatures
- Less wear on the compressor
- Lower odds of overheating
- A longer appliance lifespan
I’ve noticed this especially in homes with pets. A single dog or cat can dramatically speed up coil buildup. The hair gets pulled under the cabinet, sticks to grease in the air, and forms a felt-like mat around the lower intake area.
2. Common symptoms of dirty refrigerator coils
Before I clean any refrigerator, I usually look for a few warning signs. These are the most common symptoms of dirty refrigerator coils I’ve seen:
Refrigerator runs constantly
If your fridge hums almost nonstop, dirty coils may be part of the problem. The unit struggles to release heat, so it keeps cycling longer than it should.
Food isn’t as cold as usual
Milk spoils early. Produce feels less crisp. Ice cream turns soft around the edges. These subtle temperature shifts often appear before a complete cooling failure.
Exterior feels unusually warm
The sides, bottom edge, or center divider between doors may feel hot to the touch. Some warmth is normal. Excess heat is not.
Electric bill suddenly climbs
Poor airflow can force the unit to use significantly more power. According to Energy Saver, regular maintenance helps refrigerators operate more efficiently.
Visible lint, dust, or pet hair
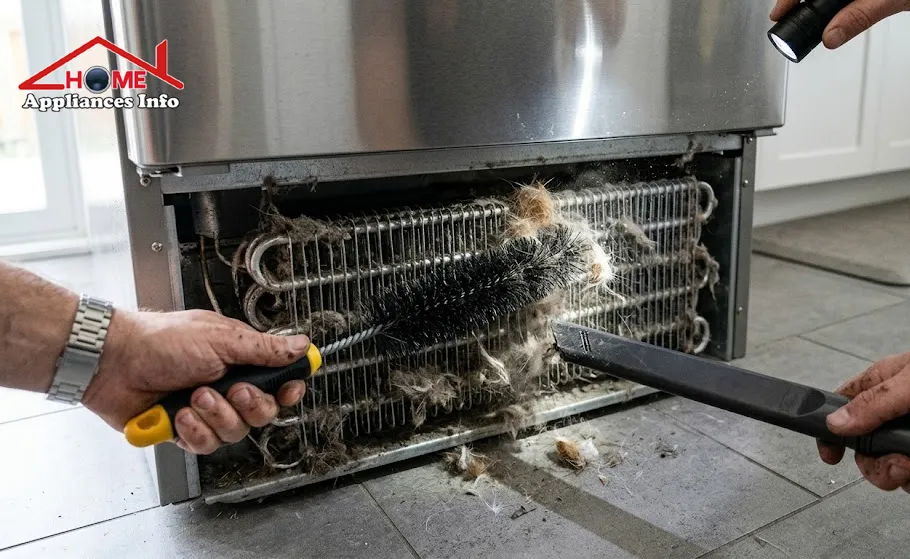
This is the obvious one. If I remove the toe kick grille and see a gray blanket of debris, I already know cleaning is overdue.
3. Tools I recommend before you start
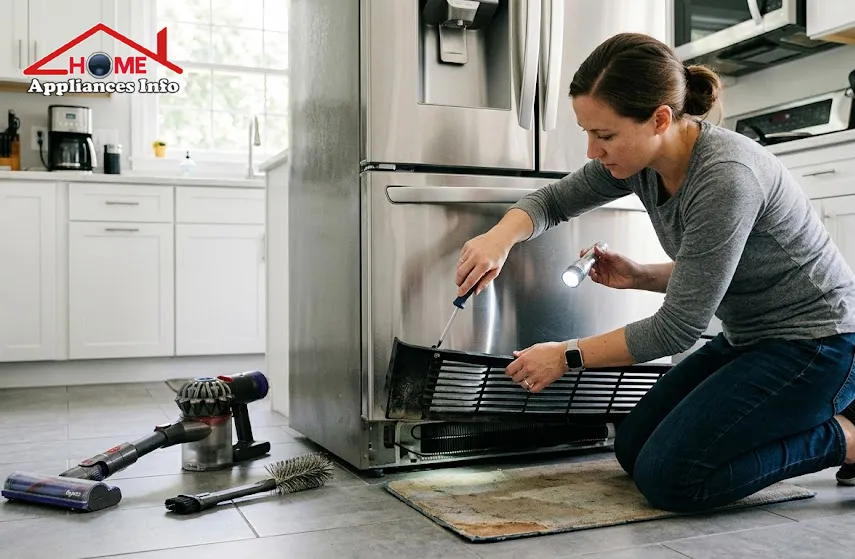
You do not need a huge toolkit. These are the items I trust most:
- A flexible coil brush
- Vacuum cleaner with crevice tool or soft brush
- Screwdriver or nut driver
- Microfiber cloth
- Dust mask, especially for heavy buildup
- Flashlight
If you’re researching how to clean refrigerator coils vacuum attachment methods, the best option is usually a narrow crevice tool. It reaches deep without crushing nearby parts. I avoid bulky floor heads because they’re awkward in tight spaces.
Here’s a quick tool guide:
| Tool | What It Does | Best For |
|---|---|---|
| Flexible coil brush | Loosens dust between coil fins | Deep cleaning tight coil spaces |
| Vacuum crevice attachment | Extracts loosened dirt and hair | Under-fridge and rear-access cleaning |
| Screwdriver/nut driver | Removes panels or grille | Accessing hidden coils |
| Microfiber cloth | Wipes dust and nearby surfaces | Final cleanup |
| Flashlight | Helps inspect hidden buildup | Underneath models and dim spaces |
4. Step-by-step: how to clean refrigerator coils safely
This is the exact sequence I follow.
Step 1: Unplug the refrigerator
Safety first. Always disconnect power before cleaning. If the plug is difficult to reach, switch off the kitchen circuit breaker.
I never skip this step. You’ll be working near wiring, metal panels, and moving dust. It’s not worth the risk.
Step 2: Locate the coils
Most refrigerators place the condenser coils in one of two spots:
- Underneath the front, behind the lower grille
- On the back, behind a rear panel
If you’re unsure, check the owner’s manual. Many brands also list maintenance instructions online. Whirlpool refrigerator help can be useful if you need model-specific guidance.
Step 3: Remove the grille or access panel
For front-bottom coils, remove the toe kick grille by unsnapping or unscrewing it.
For rear-mounted coils, carefully pull the fridge away from the wall. If your refrigerator has a water line, move slowly and avoid kinking it.
Step 4: Brush the coils gently
Insert the flexible coil brush between the fins and move it in and out carefully. Twist lightly to pull dust free. The goal is to loosen debris, not force the brush.
This is where patience matters. In my experience, rushing here bends fins and leaves half the buildup behind.
Step 5: Vacuum loosened debris
Now use your vacuum. If you’re learning how to clean refrigerator coils vacuum attachment style, keep the nozzle close to the brush path so dust is removed as it falls.
Focus on:
- Coil surfaces
- Floor area below the unit
- Corners near the compressor
- Dust pockets around wiring channels
Step 6: Wipe nearby surfaces
Use a microfiber cloth to remove leftover grime from the grille, floor, and surrounding frame. This helps prevent loose lint from being sucked back in when the fridge restarts.
Step 7: Reassemble and reconnect power
Reattach the panel or grille. Push the refrigerator back gently. Make sure the power cord and water line are not pinched. Then plug it back in.
Once finished, the unit may take a little time to normalize. That’s expected.
5. How to clean refrigerator coils underneath
Many homeowners specifically ask how to clean refrigerator coils underneath because access is tighter and more frustrating than rear-mounted models.
Here’s the method I’ve found works best:
Open the doors first
This gives you more room to remove the bottom grille without bumping into the door edges.
Use a narrow tool setup
For how to clean refrigerator coils underneath, a slim vacuum crevice wand is much more effective than a wide head. Pair it with a long coil brush, ideally around 27 to 30 inches.
Work horizontally
Slide the brush under the cabinet and pull debris toward the opening. Then catch it with the vacuum nozzle.
Clean the floor in front of the unit
This step sounds minor, but it matters. Any debris left at the base can get pulled back under once airflow resumes.
This is also where homeowners sometimes discover completely unrelated maintenance issues. I’ve found bottle caps, pet toys, and even water drips that pointed to other appliance concerns. That same close observation helps when diagnosing household problems like Whirlpool Washer F05 Error Code Troubleshooting or an E4 Error Code Fix on another machine.
6. How often to clean refrigerator coils
A lot of people ask me how often to clean refrigerator coils, and the honest answer depends on your environment.
Here’s a practical schedule:
| Household Type | Recommended Frequency | Why |
|---|---|---|
| Standard home | Every 6–12 months | Normal dust accumulation |
| Homes with pets | Every 3–6 months | Hair and dander build quickly |
| Dusty or renovating homes | Every 3–4 months | Fine particles clog coils fast |
| Commercial kitchens | Every 1–3 months | Grease and airborne debris collect faster |
If you want the simplest rule, check every six months. If you have pets, check every three.
I personally prefer inspection over guessing. A 30-second flashlight check under the grille can tell you more than a calendar reminder alone.
7. Mistakes to avoid during coil cleaning
I’ve seen a few repeat mistakes over the years. They’re easy to avoid.
Don’t scrub too aggressively
Coil fins can bend. Gentle passes are more effective than force.
Don’t forget to unplug first
This is basic but essential.
Don’t ignore surrounding debris
Cleaning the coils but leaving a carpet of dust below the unit defeats the purpose.
Don’t use water near exposed electrical parts
A damp cloth is fine for removable trim pieces. It is not for live internal components.
Don’t wait for a breakdown
By the time cooling has clearly failed, the dirt may already have stressed the compressor for months.
The U.S. government’s ENERGY STAR refrigerator maintenance guidance also supports routine upkeep as part of efficient appliance performance.
8. Real-world benefits after cleaning
This is where the task starts to feel rewarding.
After a proper coil cleaning, many people notice:
- Quieter operation
- Shorter run cycles
- Better temperature consistency
- Less exterior heat
- Lower strain on the appliance
I’ve had one fridge at home that sounded like it was struggling every evening. After cleaning, the humming softened within a day. The change was not dramatic like replacing a motor, but it was noticeable. More importantly, the refrigerator stopped running so often.
That’s the practical value here. You’re not just removing dust. You’re restoring airflow and reducing unnecessary work inside the system.
9. When cleaning isn’t enough
Sometimes dirty coils are only part of the story.
If you clean thoroughly and still notice poor cooling, it may point to:
- A failing evaporator fan
- Damaged door gaskets
- Low refrigerant
- Thermostat issues
- Compressor trouble
In that case, it’s smart to consult a qualified appliance technician. Coil cleaning is excellent preventive care, but it won’t fix every refrigeration problem.
I think of it the same way I think about broader home troubleshooting. A clean machine often reveals the real issue more clearly. That’s true whether you’re researching How to Repair Electric Pressure Cooker Problems or sorting out How to Clean Washing Machine with Vinegar and Baking Soda to improve appliance performance elsewhere in the home.
FAQs
1. How do I know if my refrigerator coils are dirty?
Look for common symptoms of dirty refrigerator coils such as constant running, poor cooling, a warm cabinet exterior, or visible dust behind the grille.
2. How often should I clean refrigerator coils?
For most homes, every 6 to 12 months works well. If you have pets, check more often. That’s the safest answer to how often to clean refrigerator coils.
3. Can I clean refrigerator coils with a vacuum only?
You can remove some loose dust that way, but a brush usually does a better job of loosening stuck debris. For how to clean refrigerator coils vacuum attachment use, combine vacuuming with a coil brush for best results.
4. How do I clean refrigerator coils underneath without moving the fridge?
Remove the bottom grille, use a long flexible coil brush, and vacuum with a narrow crevice tool. That is usually the easiest approach for how to clean refrigerator coils underneath.
5. Will dirty coils increase electricity use?
Yes. Reduced airflow makes the refrigerator work harder, which can hurt energy efficiency and increase utility costs.
6. Is coil cleaning something I can do myself?
In most cases, yes. It’s one of the more beginner-friendly appliance tasks, similar in spirit to preventive care around issues like Whirlpool Washer F05 Error Code Troubleshooting before they become major repairs.
Conclusion
Learning how to clean refrigerator coils is one of the simplest ways to protect your refrigerator without spending much money. It improves cooling efficiency, reduces stress on the fridge compressor, and helps prevent the creeping problems caused by dust and lint buildup.
If you remember only a few things, remember these: unplug first, locate the coils, loosen debris with a flexible coil brush, vacuum carefully, and repeat on a schedule that fits your home. If you have pets, stay ahead of the mess. If your unit runs hot or loud, treat that as a signal, not a quirk.
In my experience, the best home maintenance tasks are the ones that are easy to ignore but satisfying to fix. This is one of them. And once you finish, you’ll likely start noticing other small appliance habits worth improving too, from E4 Error Code Fix research to routine cleaning methods like How to Clean Washing Machine with Vinegar and Baking Soda.
A clean refrigerator works smarter. Not harder. And that’s a win for your food, your power bill, and the life of the appliance. 🙂
References
- ENERGY STAR, refrigerators
- Whirlpool, Whirlpool refrigerator help

🌐 FOUNDER & DIGITAL PUBLISHER
Muhammad Ali
Founder | SEO Strategist & E-E-A-T Digital Publishing Specialist

📈 SEO Strategy
🛠️ Appliance Optimization
🛡️ E-E-A-T Standards
Muhammad Ali is a digital publisher, SEO strategist, and founder of Home Appliances Info. He specializes in home appliance optimization, structured schema networks, and advanced E-E-A-T digital publishing standards to ensure accurate, trustworthy content across the platform.
1 Comment
Pingback: Motorhome Fridge Repairs: How to Fix an RV Refrigerator