


To support our research and detailed appliance reviews, we may earn a small commission from qualifying purchases made through our links, at no extra cost to you. As an Amazon Associate, I earn from qualifying purchases.
To support our research and detailed appliance reviews, we may earn a small commission from qualifying purchases made through our links, at no extra cost to you. As an Amazon Associate, I earn from qualifying purchases.
If you are planning a pellet stove installation, I’ll start with the part many homeowners underestimate: the stove itself is only half the project. The venting route, clearances, floor protection, electrical access, and local code rules matter just as much as the appliance you choose. I’ve seen well-planned installs heat a home beautifully for years, and I’ve also seen rushed setups create smoke stains, poor draft, and carbon monoxide concerns.
Pellet stoves are one of the more practical home heating options for people who want steady heat without splitting firewood. They burn compressed wood pellets, feed fuel automatically, and use an electric exhaust fan to push combustion gases outdoors. But because they are mechanical wood pellet appliances, they need a safe path for exhaust, enough air for combustion, and proper access for cleaning.
Below, we’ll walk through the full setup in plain language: cost, venting choices, basement challenges, pipe installation, safety checks, and when to call a certified professional.
Quick 2026 Guide: What to Know Before You Start
Before any pellet stove installation, I recommend slowing down and checking five things:
- Your local building permit requirements.
- The stove manufacturer’s manual.
- The vent pipe listing and clearance rules.
- Whether your room has enough fresh air.
- Where the exhaust will terminate outside.
Most studies and safety organizations agree on one point: improper venting is the biggest risk. It can cause smoke backflow, poor stove performance, ash buildup, or carbon monoxide exposure.
Typical 2026 budget ranges:
| Item | Typical Cost Range |
|---|---|
| Pellet stove purchase | $1,500–3,500 |
| Installation labor | $500–1,500 |
| Venting materials | $300–800 |
| Total installed range | $2,000–4,000 |
| Annual cleaning and inspection | $150–300 |
I’ve found that simple through-wall installs are often near the lower end. Basement installs, tall vertical runs, roof penetrations, and masonry chimney liners can push the price higher.
1. Plan Your Pellet Stove Installation Around the Room, Not the Stove
A pellet stove needs to sit where it can heat effectively, vent safely, and be cleaned without frustration. In my experience, the best location is not always the prettiest corner. It is the place where the vent path is short, clear, and code-compliant.
Look for:
- A nearby exterior wall or chimney route.
- Access to a grounded electrical outlet.
- Enough room for side, rear, and front clearances.
- Space for pellet bags and ash cleanup.
- A floor surface that supports hearth pad protection.
Most pellet stoves require a non-combustible pad under the unit. This protects wood, vinyl, laminate, and carpet from heat, embers, and ash. The required pad size depends on the model, so read the manual before buying one.
Also check the stove label. Many units are certified by organizations such as UL or CSA, and modern models may meet U.S. Environmental Protection Agency emissions standards. You can learn more about efficient appliance selection from the EPA’s guidance on EPA-certified stoves.
A quick homeowner note: if you’re already troubleshooting appliances around the house, it helps to keep a maintenance mindset. The same patience you’d use for Gas stove won’t ignite problems applies here: inspect first, then repair or install.
2. Pellet Stove Installation Cost: What You’re Really Paying For
The pellet stove installation cost is more than the stove and a few pipes. You are paying for safety, proper draft, exterior weatherproofing, and long-term serviceability.
Here is a more realistic breakdown:
| Cost Factor | Low Range | High Range | Notes |
|---|---|---|---|
| Stove unit | $1,500 | $3,500 | Larger, higher-efficiency models cost more |
| Vent pipe kit | $300 | $800 | Longer vertical runs increase cost |
| Hearth pad | $100 | $500 | Custom stone or tile costs more |
| Labor | $500 | $1,500 | Depends on wall, roof, or chimney work |
| Permit/inspection | $50 | $300 | Varies by city or county |
| Fresh air intake | $50 | $250 | Often recommended, sometimes required |
Professional installation typically lands between 2,000and2,000and4,000. I’ve seen DIY setups cost much less, but only when the homeowner already understands vent routing, flashing, pipe clearances, and local codes.
The hidden cost is correction. If a vent exits too close to a window, deck, gas meter, soffit, or neighbor’s property line, it may need to be rebuilt. That can cost more than doing it right the first time.
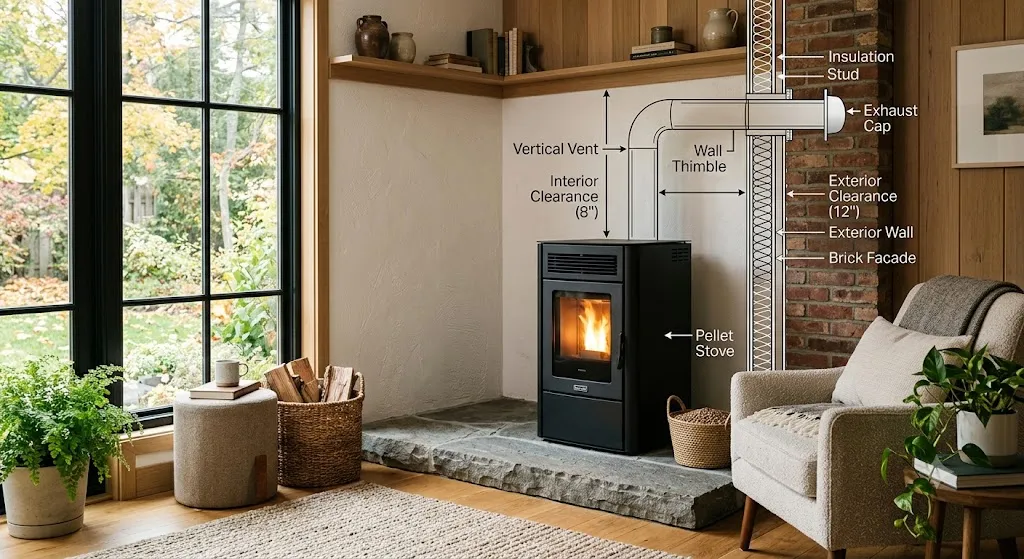
3. How to Install a Pellet Stove Pipe Safely
When people ask how to install a pellet stove pipe, I explain it like this: the pipe is the stove’s breathing system. If it leaks, clogs, sags, or runs too long, the stove struggles.
Use only vent pipe rated for pellet appliances. This is usually listed double-wall pellet vent, often called Type L vent. Brands such as DuraVent PelletVent Pro and Selkirk are common examples, but always match the pipe diameter and listing to the stove manual.
Basic pipe rules:
- Use double-wall pellet vent pipe.
- Follow the manufacturer’s listed exhaust pipe clearance.
- Keep runs short and direct.
- Seal joints with high-temperature silicone where required.
- Use a clean-out tee at the base of vertical sections.
- Support vertical pipe properly.
- Terminate outdoors with the correct cap.
Many pellet vent systems have listed clearances from combustibles, often 1 to 3 inches depending on the product and installation. If your manual says 3 inches, respect that. If the pipe label says something different, follow the stricter rule.
For a basic through-wall route, the pipe usually exits the back of the stove, connects to an appliance adapter, passes through a wall thimble, and terminates outside with a cap. The wall thimble is not optional. It protects the wall cavity from heat and maintains clearance.
Never vent into:
- An attic.
- A crawl space.
- A garage.
- An HVAC duct.
- An enclosed porch.
- An existing chimney without an approved liner.
Venting into an HVAC system is especially dangerous because it can distribute combustion gases through the home.
4. Venting a Pellet Stove: Compare the Main Options
Venting a pellet stove is where installation planning becomes specific. A pellet stove uses a fan-assisted exhaust system, but that does not mean the vent can go anywhere. The route should still support draft, reduce ash buildup, and protect the home during a power outage.
Here’s a practical comparison:
| Venting Method | Best For | Pros | Cons |
|---|---|---|---|
| Horizontal through-wall | Ground-floor rooms | Simple, lower cost | Less natural draft, possible wall staining |
| Vertical through-roof | Basements, multi-floor homes | Stronger draft, safer during outages | Higher cost, more complex |
| Hybrid up-and-out | Corner installs, difficult layouts | Flexible routing | More elbows and joints to clean |
| Existing masonry chimney with liner | Homes with usable chimneys | Keeps exhaust high above roofline | Requires stainless liner and inspection |
For many main-floor rooms, horizontal through-wall venting works well. But I prefer adding at least some vertical rise when possible. It helps carry smoke upward if the exhaust fan stops during a power outage.
For vertical systems, use a compatible chimney vent kit or listed pellet vent components. Do not mix random parts from different systems unless the manufacturer specifically allows it.
The National Fire Protection Association publishes chimney and venting standards under NFPA 211. Local codes may adapt or expand these rules, so inspections matter.
5. Installing Pellet Stove in Basement: What Changes Below Grade
Installing pellet stove in basement spaces can be an excellent way to warm a lower level, but it is not always simple. Basements often have negative air pressure. Clothes dryers, bathroom fans, kitchen range hoods, and furnaces can pull air from the basement and compete with the stove.
I once inspected a basement setup where the stove ran fine until the dryer turned on. Then the flame became lazy, the glass darkened quickly, and a faint smoke smell appeared. The fix was not a bigger stove. It was better combustion air and a corrected vent route.
Basement considerations:
- Plan for vertical venting where possible.
- Use a dedicated outside air intake if recommended.
- Avoid long horizontal vent runs.
- Keep the stove away from stored paint, fuel, and solvents.
- Install a carbon monoxide detector in the same room.
- Make sure stairs and doors allow heat to move upstairs.
A basement stove may heat the lower level beautifully while the upstairs stays cooler. If whole-house heating is the goal, consider floor plan, stairwell position, insulation, and air circulation.
6. Basement Pellet Stove Venting: The Safer Way to Route Exhaust
Basement pellet stove venting deserves special attention because the exhaust often starts below grade. A pipe cannot simply run straight out through soil or into a window well. The termination must be above grade, protected from snow, and positioned away from windows, doors, and air intakes.
Purely horizontal basement runs are discouraged unless the manufacturer allows them and the site conditions are ideal. The concern is power failure. Pellet stoves rely on electricity to run the exhaust fan. If the fan stops, a horizontal-only pipe has little natural draft to move smoke outdoors.
A safer basement approach often looks like this:
- Stove connects to a clean-out tee.
- Pipe rises vertically indoors or exits above grade.
- Vent continues upward outside for 3 to 5 feet or more.
- Termination cap sits away from doors, windows, and snow buildup.
- Joints remain accessible for inspection and cleaning.
A clean-out tee is especially useful in basement installations. Ash settles in low points. Without a clean-out, maintenance becomes messy and inconsistent.
I also recommend a dedicated fresh air intake for many basement installations. It helps stabilize combustion and reduces the chance of backdrafting. Some jurisdictions require it for tight homes or mobile homes.
For carbon monoxide basics, the CDC has clear homeowner guidance on carbon monoxide safety.
7. Clearance, Combustibles, and Hearth Protection
Clearance is one of those words that sounds technical until you picture it. It simply means keeping hot surfaces far enough from things that can burn.
Combustibles include:
- Wood studs.
- Drywall paper.
- Curtains.
- Furniture.
- Trim.
- Carpet.
- Shelving.
- Pellet bags.
The stove manual will list rear, side, corner, and front clearances. The vent pipe will have its own clearance requirements. Treat both as separate rules.
Hearth pad protection matters too. The pad should extend beyond the front and sides of the stove according to the manual. Some pads are ember protection only. Others have an insulating R-value. Buy the type your stove requires.
This is similar to other home appliance work. When we explain E4 Error Code Fix topics, the answer depends on the exact model. Pellet stoves are the same. The manual wins.
8. DIY vs. Professional Installation: How to Decide
A careful DIYer can install some pellet stoves. But not every project is a good candidate.
DIY may be reasonable if:
- The stove is on a ground floor.
- The vent exits through a simple exterior wall.
- You understand clearances and wall thimbles.
- Local code allows homeowner installation.
- You can schedule inspection.
Hire a professional if:
- The stove is in a basement.
- The pipe must pass through a roof.
- You need a chimney liner.
- The home has pressure or draft issues.
- The wall contains wiring, plumbing, or masonry.
- You are unsure about local code.
A certified installer can also protect your warranty. Some manufacturers require professional installation or inspection documentation. Insurance companies may ask for permits and proof of code compliance after a claim.
I always tell homeowners: if you feel uncertain at the venting stage, stop and get help. The cost of a consultation is small compared with the cost of smoke damage or unsafe exhaust.
9. Step-by-Step Setup Checklist
Here is the basic sequence I use when reviewing a project plan. This is not a replacement for your manual or local code, but it gives you the right order of operations.
Step 1: Choose the stove size
Do not oversize blindly. A stove that is too large may cycle on and off, wasting pellets and creating more ash. Match BTU output to your square footage, insulation, climate, and layout.
Step 2: Confirm permits and inspection
Call your local building department. Ask about pellet stove permits, vent termination rules, and inspection requirements.
Step 3: Pick the location
Mark the stove footprint, hearth pad size, vent path, and clearances. Check both inside and outside before drilling.
Step 4: Install the hearth pad
Place the pad on a stable, level surface. Confirm it extends far enough beyond the stove.
Step 5: Assemble the vent route
Use listed pipe, wall thimble, clean-out tee, elbows, supports, and termination cap. Seal joints as directed by the vent manufacturer.
Step 6: Add outside air if needed
Install the fresh air intake according to the stove manual. Keep it away from exhaust termination points.
Step 7: Set the stove and connect power
Use a grounded outlet. Many homeowners also add a surge protector or battery backup because pellet stoves depend on electricity.
Step 8: Test burn and inspect
Run the stove while checking for smoke leaks, proper flame shape, unusual noises, and exterior exhaust flow.
Step 9: Install alarms
Place smoke and carbon monoxide detectors near the stove and sleeping areas. For basements, I strongly prefer a CO detector in the same room as the stove.
Step 10: Schedule maintenance
Clean burn pots, ash traps, glass, and venting regularly. Annual professional service is usually worth the cost.
For broader cleaning routines around the house, our guide on How to Clean Washing Machine with Vinegar and Baking Soda pairs well with a seasonal home maintenance checklist.
10. Common Mistakes I See Homeowners Make
The most common problems are not dramatic. They are small decisions that stack up.
Avoid these mistakes:
- Using dryer vent or single-wall pipe.
- Skipping the wall thimble.
- Venting too close to a window.
- Forgetting snow height near the termination.
- Placing the stove too close to furniture.
- Running too many elbows.
- Ignoring ash clean-out access.
- Installing without a permit.
- Assuming a basement install works like a living room install.
Another mistake is ignoring makeup air. Modern homes can be tight. If the stove cannot get enough combustion air, performance drops fast.
FAQs About Pellet Stove Installation
1. Can I install a pellet stove myself?
Yes, in some areas homeowners can do it themselves, but only if local code allows it and the setup is simple. I recommend professional help for roof penetrations, chimney liners, and basement installations.
2. Does a pellet stove need a chimney?
Not always. Many pellet stoves use a direct vent through an exterior wall. However, vertical venting or a lined chimney can improve draft, especially in basements and multi-story homes.
3. How much does pellet stove installation cost?
The typical installed range is 2,000–2,000–4,000, including the stove, labor, venting materials, and basic accessories. Complex venting can cost more.
4. Is basement pellet stove venting safe?
Yes, when designed correctly. The vent should exit above grade and usually include vertical rise, a clean-out tee, proper termination, and carbon monoxide safety measures.
5. How often should I clean the vent pipe?
Most homeowners should inspect and clean the vent at least once per heating season. Heavy use may require more frequent cleaning because ash can collect inside elbows and tees.
6. Can a pellet stove help if my gas appliance is unreliable?
It can be a useful backup heat source, but it is not a repair for gas appliance issues. If your kitchen unit is failing, review Gas stove won’t ignite troubleshooting separately.
Conclusion: Install for Safety First, Comfort Second
A successful pellet stove installation is not just about warmth. It is about safe venting, smart placement, reliable airflow, and a setup you can maintain year after year.
If your project is a simple main-floor through-wall vent, DIY may be possible with careful planning. If you are working below grade, routing through a roof, or dealing with pressure problems, bring in a qualified installer. Basement setups need extra care because airflow and draft are less forgiving.
My best advice is simple: choose an efficient stove, respect the manual, keep the vent route short and cleanable, install CO protection, and budget for annual maintenance. Done right, a pellet stove can become one of the most dependable and satisfying heating upgrades in your home.
References
- U.S. Environmental Protection Agency: EPA-certified stoves
- Centers for Disease Control and Prevention: carbon monoxide safety
- National Fire Protection Association: NFPA 211

🌐 FOUNDER & DIGITAL PUBLISHER
Muhammad Ali
Founder | SEO Strategist & E-E-A-T Digital Publishing Specialist

📈 SEO Strategy
🛠️ Appliance Optimization
🛡️ E-E-A-T Standards
Muhammad Ali is a digital publisher, SEO strategist, and founder of Home Appliances Info. He specializes in home appliance optimization, structured schema networks, and advanced E-E-A-T digital publishing standards to ensure accurate, trustworthy content across the platform.
1 Comment
Pingback: Best Smart Pet Camera with Treat Dispenser: July 2026 Picks